Eshikshakosh Demo Portal – Login, Practice & Guide 2026
The Eshikshakosh demo portal is a sandboxed replica of Bihar’s official teacher management system, built and maintained by the Bihar Education Project Council (BEPC). It sits at a separate address — demoeshikshakosh.bihar.gov.in — and mirrors the full interface of the live portal at eshikshakosh.bihar.gov.in without touching any real government database.
BEPC created this practice environment specifically for newly appointed BPSC teachers, Niyojit (contractual) teachers, school headmasters, and block-level data entry operators. On the demo portal, a teacher can walk through registration, mark test attendance, submit leave requests, and upload sample documents — and when they’re done, nothing they entered affects any official record. One critical point before you go further: data entered in the demo portal is not saved permanently. BEPC wipes the test database on a periodic schedule. Any Teacher ID, registration reference number, or document you upload there disappears after the next reset. This is by design — it is a training environment, not a staging server.
Quick access — demo portal link and what to do if it won’t open
Demo portal URL: demoeshikshakosh.bihar.gov.in. Open this in Google Chrome on desktop or Android. If you’re on a phone, tap the three-dot menu in Chrome and select “Request Desktop Site” before logging in — the portal’s layout doesn’t adapt cleanly to mobile screens without this step.
Portal not loading? Three things fix most issues instantly:
- Clear your browser cache (Chrome: Settings → Privacy → Clear browsing data)
- Try opening in Incognito mode (this bypasses cached errors)
- Avoid peak hours (10AM–3PM) — server load is highest then; early morning or after 8PM works better on slow connections
Eshikshakosh demo portal क्या है? — What it is, who made it, and why it exists
E-Shikshakosh is an integrated digital platform launched by the Bihar Education Project Council under the Education Department, Government of Bihar. It covers the complete lifecycle of government school education in Bihar — student enrollment, teacher attendance, service book management, salary tracking, school inspection, and grievance redressal — across more than 72,000 schools and over 7 lakh educators statewide.
The demo portal is BEPC’s answer to a practical problem: Bihar’s recruitment drives between 2022 and 2025 brought over 1.2 lakh new BPSC teachers into government schools. Most of them had never used a government digital portal before. Sending them directly to the live system — where a wrong Aadhaar digit in a registration form creates a correction request that takes weeks to resolve — was a recipe for administrative chaos.
So BEPC built a mirror. Same screens, same form fields, same approval workflow — but none of the consequences. A teacher who makes a mistake in demo simply refreshes and tries again. The same mistake on the live portal requires the DEO to intervene.
डेमो पोर्टल का उद्देश्य: नए शिक्षकों को लाइव पोर्टल पर जाने से पहले पूरी प्रक्रिया सुरक्षित रूप से अभ्यास करने का मौका देना।
Who should use the demo portal — and who shouldn’t
Use the demo portal if you are:
- A newly appointed BPSC teacher who has received a posting order but hasn’t completed portal registration yet. The demo lets you practice filling the registration form, uploading documents, and understanding what “Pending Approval” and “Returned with Query” status messages look like — before your real submission.
- A Niyojit (contractual) teacher new to the system who wants to understand your dashboard, check how salary status appears, and practice submitting leave requests.
- A school headmaster who needs to practice student DCF (Data Capture Format) entry. Entering student data incorrectly in the live portal corrupts UDISE+ records — a correction process that can take weeks. Demo gives you a consequence-free environment to get this right first.
- A block or district data entry operator testing bulk data formats before processing real school records.
- Do not use the demo portal if you’re an experienced teacher who already has a Teacher ID and active login. The demo won’t show your salary, leave balance, or real service book. For those tasks, go directly to eshikshakosh.bihar.gov.in.
Demo portal vs live portal — what’s actually different
| Feature | Demo Portal | Live Portal |
|---|---|---|
| URL | demoeshikshakosh.bihar.gov.in | eshikshakosh.bihar.gov.in |
| Data saved permanently | No — wiped periodically | Yes — official government records |
| Aadhaar OTP required | No — OTP is simulated | Yes — real OTP on registered mobile |
| Salary data visible | Simulated figures only | Real salary and disbursement records |
| Leave applications processed | No — test submissions only | Yes — routed to DEO for approval |
| Attendance marks count | No | Yes — official attendance record |
| Who can access | Open practice environment | Only registered teachers/schools |
| Teacher ID generated | Fake — unusable on live portal | Permanent — used for all future logins |
Three things every teacher must know before using the demo:
- First, attendance marked in the demo does not count toward your official record. It won’t show up in your salary calculation or leave balance under any circumstances.
- Second, leave applications submitted in demo are not processed. They exist only until the next database wipe. Do not expect approval notifications or status changes on demo leave requests.
- Third, the Teacher ID you see in demo after a practice registration is not real. It cannot be used to log in to eshikshakosh.bihar.gov.in. Your actual Teacher ID comes only after your real registration is approved by your DEO.
How to open the Eshikshakosh demo portal — step-by-step
- Open Google Chrome or Mozilla Firefox. Avoid Internet Explorer and older Samsung browser versions — the portal uses JavaScript functions these browsers don’t support.
- Type demoeshikshakosh.bihar.gov.in directly in the address bar. Do not search for it on Google and click a third-party link — several unofficial sites redirect to fake lookalike pages.
- Wait for the login screen. On a 4G connection this takes 5–8 seconds. On 3G or a weak signal, allow up to 20 seconds before assuming it hasn’t loaded.
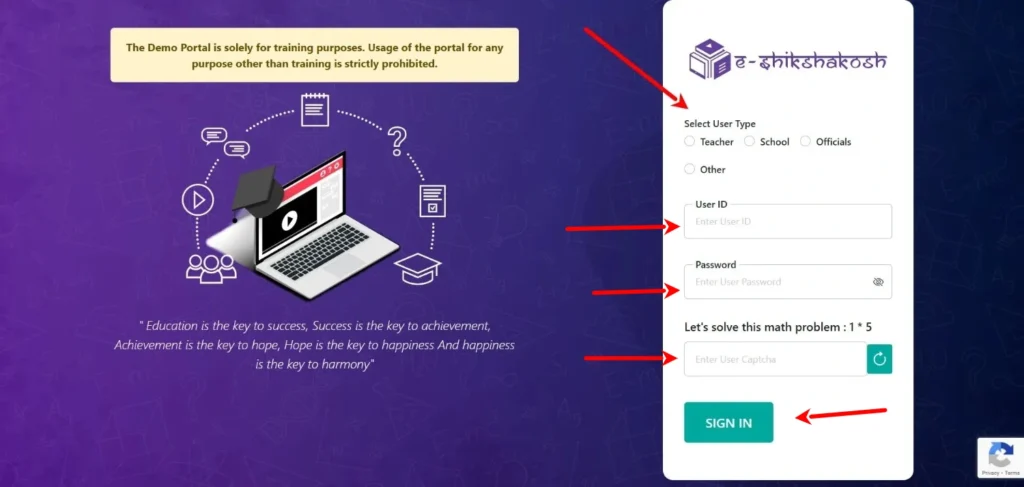
- Select your user type from the dropdown menu before filling any fields. The options are: Teacher, School (Headmaster), and Officer. Selecting the wrong type and then filling credentials is one of the most common causes of the “Login Failed” error.

- Enter the demo credentials provided by BEPC (see the next section for details).
- Solve the math CAPTCHA. If the numbers are blurry or the image doesn’t display, click the refresh icon next to it — a new CAPTCHA generates immediately. Do not reload the full page, which clears your filled fields.
- Click Login. The practice dashboard opens within 3–5 seconds on a stable connection.
Demo portal login credentials — what username and password to use
This is the question most teachers can’t find an answer to anywhere, so here it is clearly.
The demo portal uses BEPC-provided test credentials for practice — not your real Teacher ID or school UDISE code. When you land on the demo login screen, the username and password fields may already be pre-filled with test values. If they are, use those directly.
If the fields are blank, the standard test credentials used in BEPC training sessions follow this format:
- Teacher login: Username:
DEMO12345| Password:Demo@1234 - School login: UDISE:
23456789012| Password:School@123
Important: These credentials are shared across all demo users. If they don’t work — which can happen if BEPC has updated them after a security review — contact your Block Education Officer (BEO) or the BEPC MIS helpdesk at helpdesk.esks@gmail.com to get the current test login details.
Do not try your real Teacher ID on the demo portal. It will return a “User Not Found” error — not because your ID is wrong, but because the demo database doesn’t contain real teacher records. This error on the demo means nothing about your status on the live portal.
Using the demo portal on an Android phone
The demo portal has no separate app. The eshikshakosh app on the Google Play Store connects exclusively to the live portal — there is no demo mode inside it. Practice on the demo must be done through a browser.
On Android, this is the reliable setup:
- Open Chrome
- Tap the three-dot menu (top right)
- Tick “Request Desktop Site”
- Now navigate to demoeshikshakosh.bihar.gov.in
Without requesting the desktop site, some form fields overlap and the submit button may not appear on screen. The selfie attendance module and GPS geofencing features do not function in the demo environment on any device — these require the live portal and active app integration. Teachers using Android 5.x (Lollipop) or older may find the CAPTCHA doesn’t render correctly. In that case, switch to Firefox for Android, which handles the portal’s older JavaScript framework better.
What you can practice on the Eshikshakosh demo portal — all modules explained
The demo portal mirrors 9 of the 11 modules available on the live portal. The two not available are live salary disbursement and Aadhaar-linked OTP verification. Everything else — the screens, the form fields, the approval workflow, the error messages — behaves identically to what teachers will encounter on eshikshakosh.bihar.gov.in.
Practicing teacher registration — the most valuable thing to do on demo
For a newly appointed BPSC teacher, this is the single most important use of the demo portal.
Open the demo, select Teacher from the dropdown, and look for “Teacher Registration” on the login screen or dashboard. Click “New Registration” — not “Existing Teacher Login.”
Fill the registration form using test data, not your real details. For name, use something like “DEMO SHIKSHAK.” For date of birth, use any valid past date. For mobile number, use any 10-digit number beginning with 7, 8, or 9. The only field you should fill with your actual information — to make the practice realistic — is the posting district and block, since you’ll need to know how to navigate those dropdowns correctly.
For document upload, scan any blank page, save it as a PDF under 2MB, and rename it “appointment_letter.pdf.” Upload that. The demo portal enforces the same file-format rules as the live portal: PDF or JPG only, under 2MB. If the demo rejects your test file, your real appointment letter in the same format will also be rejected. Fix the file format now, before it matters.
After submitting, observe the confirmation screen carefully. Note the reference number format — it won’t be usable on the live portal, but the screen layout is identical. Then observe the “Pending Approval” dashboard. On the demo, auto-approval typically happens within 30 seconds, because there’s no real headmaster who needs to act. On the live portal, your headmaster must log in and approve your application before it moves to the DEO.
The “Returned with Query” screen — practice seeing this too. In the live portal, your application returns with this status if the DEO finds a discrepancy (most often: the name on your BPSC certificate doesn’t match the name on your Aadhaar exactly, even by one letter). To see this screen in demo, submit an application and ask someone with headmaster credentials to navigate to “Application Management” and click “Return with Query.” This shows you exactly what the notification looks like and what information the DEO typically flags.
Practicing student DCF entry — for headmasters and school operators
DCF stands for Data Capture Format — the digital form through which schools enter student enrollment data that maps to UDISE+ records. Getting a student’s category (SC/ST/OBC/General), disability status, or date of birth wrong in the live portal creates a correction request that takes the DEO’s direct intervention to resolve.
The demo lets headmasters practice this without risk.
Log in with school demo credentials. Go to Student Management → New Student Entry. Fill the DCF form using fictional data: any 12-digit number as the student’s Aadhaar (the demo doesn’t validate against UIDAI), any valid name and date of birth, and the correct class and section format.
The field that trips up most operators is category — once submitted, category cannot be edited even in demo mode (same restriction as live). Practice selecting it carefully. The field order is: General → OBC → EBC → SC → ST. Confirm your selection before clicking submit.
After completing a test entry, navigate to Student Records → View to see how the submitted data appears to the headmaster and how it would look to a DEO reviewing it. This view is identical to the live portal.
Practicing leave applications — getting the leave type right the first time
Bihar teachers have three primary leave types: Casual Leave (CL), Earned Leave (EL), and Medical Leave (ML). Submitting the wrong type on the live portal requires DEO cancellation — a process that takes days and temporarily blocks your leave balance.
On the demo, go to Leave Management → Apply for Leave. Select leave type from the dropdown, enter the date range, add a remark (any text works), and submit.
After submission, observe: the application goes to “Pending at School” status. On the live portal, the headmaster then approves or rejects it before it moves to BEO. On demo, the workflow shows identically but no actual approval is required.
Use this opportunity to learn the difference between leave types in the portal’s own terminology — it’s slightly different from the service rule language. “Compensatory Leave” appears as “CL(C)” in the dropdown. “Child Care Leave” is a separate category available only to female teachers. Knowing this before your first live submission prevents the most common leave-type errors.
Practicing service book document upload
The Bihar Education Department issued a directive requiring all teachers to upload their educational and professional certificates to the e-service book module. This is a live requirement — incomplete service books can affect salary processing.
The demo portal’s service book module lets teachers test the upload process before doing it on the live portal.
Go to Service Book → Document Upload. Select the document type from the dropdown (options include: 10th Certificate, 12th Certificate, Graduation Degree, B.Ed Certificate, Appointment Order, Caste Certificate, and Bank Passbook). Upload a test PDF.
The format requirements are enforced identically in demo and live: PDF or JPG, maximum 2MB per file. If your scanned certificate is larger than 2MB — which is common with high-resolution phone scans — use a compression tool like ilovepdf.com or Smallpdf before your real upload. If the test file uploads successfully in demo, the same file will upload successfully on the live portal. If it fails in demo, fix it now.
What NOT to enter on the Eshikshakosh demo portal — safety rules for teachers
Warning: The demo portal is a shared training environment. Any data you enter is accessible to BEPC administrators and may be seen by other users in BEPC-managed training sessions. Treat it like a public shared computer.
Never enter the following on the demo portal:
- Your real 12-digit Aadhaar number. The demo doesn’t validate against UIDAI, but the number you type is stored in a shared test database until the next wipe. Any BEPC administrator with database access can see it.
- Your bank account number and IFSC code. There is no payment processing in demo, but these details sitting in an unsecured test environment is an unnecessary risk.
- Your real mobile number if it’s different from your officially registered contact. Use a placeholder 10-digit number instead.
- Any password you use on real government portals. Do not reuse your live eshikshakosh password as a demo credential anywhere.
- Your actual scanned appointment letter or Aadhaar card. Use a blank PDF renamed as a test document instead. The demo doesn’t need your real documents — it only needs a file in the correct format to test the upload mechanism.
Demo eshikshakosh.bihar.gov.in registration online — complete practice walkthrough for new teachers
If you’re a newly appointed BPSC teacher preparing for your first live registration, run through this entire sequence on the demo portal first:
- Step 1. Go to demoeshikshakosh.bihar.gov.in and click “Teacher Registration” on the login screen.
- Step 2. Select “New Registration.” You’ll see a multi-page form. Page 1 asks for personal details (name, DOB, gender, category, mobile number). Use test data here — fictional name, your real district, and any 10-digit mobile number.
- Step 3. Page 2 asks for posting information: school name, block, district, and your appointment order number. Navigate the district and block dropdowns — this is where many teachers get confused on the live portal because the dropdowns are nested. Practice selecting your actual district and block so you know exactly where they appear.
- Step 4. Page 3 requires document uploads. Upload a blank test PDF (any blank page scanned and saved under 2MB) for each document slot. This tests whether your file format is compatible. If upload fails in demo, it will fail in live — fix the format now.
- Step 5. Review page — confirm all details before final submit. On the live portal, this is your last chance to catch errors. Practice reading every field carefully here.
- Step 6. Submit. The confirmation screen shows a reference number. On demo, approval happens automatically within 30 seconds. On the live portal, your headmaster must approve within 72 hours.
- Step 7. Observe the post-approval dashboard. This is what your live portal dashboard will look like after your Teacher ID is generated. Note where your profile, leave balance, and service book sections are.
Documents to prepare before your real registration — and how demo helps you test them
These are the documents you’ll need for actual registration on the live portal:
- Aadhaar card (mobile number must be linked)
- BPSC/Niyojit appointment order
- 10th certificate (scanned PDF or JPG, under 2MB)
- 12th certificate (same format)
- Graduation degree (same format)
- B.Ed certificate (same format)
- Bank account passbook — first page only, showing account number and IFSC
- Passport-size photo (JPG format, under 500KB)
- Caste certificate, if applicable (PDF, under 2MB)
Use the demo portal to test every upload file before your real submission. If any file fails the format check in demo, compress or reformat it before your live registration attempt. The 2MB size limit is strictly enforced — government portals do not warn you in advance, they simply reject the upload.
Niyojit teacher demo portal login
Niyojit (contractual) teachers have a different access level than BPSC permanent teachers — both in the live portal and in the demo. This distinction matters, and no guide online explains it clearly.
On the demo portal’s login screen, Niyojit teachers should click “Niyojit Teacher Login” — not the standard Teacher Login button. Entering a Niyojit teacher code in the standard Teacher Login field returns a “User Not Found” error even in demo mode. This is expected — the two login pathways are separate.
What Niyojit teachers can practice in demo:
- Profile view and basic information update
- Leave application (CL and EL only — ML application requires headmaster’s offline documentation)
- Salary status display (shows simulated payment records)
- Attendance marking (manual form only — selfie attendance not available in demo)
- Grievance submission workflow
What Niyojit teachers cannot access in demo (same restrictions as live):
- E-service book editing — this is read-only for Niyojit teachers
- Mutual transfer application — this module is restricted to permanent BPSC teachers
- DCF (student data) submission — this is a school-level function, not teacher-level
FAQs
What is the URL of the eshikshakosh demo portal?
The official demo portal address is demoeshikshakosh.bihar.gov.in. This is the only legitimate address. Do not use any other URL that claims to be an eshikshakosh demo — the official portal is operated exclusively under the .bihar.gov.in domain.
Is the demo portal free to use?
Yes, completely. The demo portal is a public training resource provided by BEPC at no cost. No registration, payment, or government ID is required to access it.
Can I use my real Teacher ID to log in to the demo portal?
No. The demo portal uses BEPC test credentials, not real teacher records. Your actual Teacher ID only works on eshikshakosh.bihar.gov.in. Attempting to use it on the demo returns a login error.
How often does BEPC wipe the demo data?
BEPC clears the demo database periodically — typically every 7 to 14 days. The exact schedule is not published. Treat any data entered in demo as temporary.
After demo — moving to the live portal with confidence
Once you’ve run through registration, document uploads, and the leave application workflow on the demo portal, you’re ready for the real thing. The live portal — eshikshakosh.bihar.gov.in — differs from the demo in two practical ways: it triggers a real Aadhaar OTP to your registered mobile number during sensitive actions (keep your Aadhaar-linked phone nearby), and your headmaster must approve your application within 72 hours before it reaches the DEO.
Your Teacher ID, once generated on the live portal, is your permanent credential for the entire Bihar government education system. Keep it in a safe place — retrieving a lost Teacher ID requires a written request through your school principal to the DEO.
Before your first live login, have ready:
- Aadhaar card with the mobile number currently active and in your hand
- BPSC appointment order (PDF, under 2MB)
- All educational certificates scanned and tested in demo (under 2MB each)
- Bank passbook first page scan
- School UDISE code from your headmaster
- 45–60 minutes of uninterrupted time